Short Term Goals.
My short term goals are to create a portfolio that I can take for interviews for an interview for a placement, and to improve my work and very it more so that I can have contrasting pieces. I also want to get better at garment construction since I want to make my own collection in 3rd year. I also need to save up to be able to afford my 3rd year collection so I am hoping to get paid placements. I also aim to do 2 visual merchandising placements in the summer holidays with the 2 companies that I work for and to try buying next year as well as interview for Topshop hopefully.
Long Term Goals.
In the long term I wish to have 2 portfolios that I can take to interview since companies are very different and can want different things i.e. M&S and All Saints are very different. I would also want to work in a designer house or a luxury high street company such as All Saints doing design or possibly buying. I would in the very long term like to own my own clothing company or possibly branch out into jewellery as well which I am also interested in.
Thursday, 29 March 2012
Wednesday, 28 March 2012
Shoes day 2

Shoes was an over all joy to do and I learnt many new skills that I may be able to use in other projects or can use if I wanted to change to accessories which could be a possibility.
Monday, 26 March 2012
Shoes Day 1
Today I modified my final design since we didn't have any white matte leather like we were told so I have changed my idea to a far simpler idea with just a bar down the front instead of a disk of any kind. We then masking taped up our lasts and cut them in half and put them onto paper to make our patterns. We then did a mean forme of our shoe which was the average and designed out patterns on there. We then traced off our designs into pattern pieces using bradl's and then added on the necessary seam allowances and then cut out our pieces of leather so that on Wednesday we can finish our shoe!
Top Picture: Masking tape pieces - inside and outside of last, Mean forme, Standard pattern.
Bottom Picture: Pattern pieces with seam allowance and Leather cut out pieces.

Top Picture: Masking tape pieces - inside and outside of last, Mean forme, Standard pattern.
Bottom Picture: Pattern pieces with seam allowance and Leather cut out pieces.


Thursday, 22 March 2012
Illustrator
In illustartor we will be using it to make a pattern, and made the new document a3 and portrait.
 we then did a red star with blue circle over the top and used the divide tool.
if you then drag the shapes into swatches and create a new shape it will create a new pattern.
 |
| green:we then used the width tool, we then opened up the shapes as well and made a rectangle, we then clicked the rectangle and changed the outline, and used the width tool |
 |
| yellow square: we then used the warp tool to create the pushed in edges. |
 |
| pink: we then made a hexagon and used the pucker tool and clicked and dragged to create a pattern. |
 |
| red: we then used the wrinkle tool |
 |
| blue: we then used the bloat tool on a rectangle to create fingers |
 |
| purple: we then used the scallop tool to create the edges |
 |
| navy: we then used the crystalize tool. |
 |
| ed and blue : we then used the swirl tool to create the curves on the star |
 |
| we then created a new file and opened pathfinder as well as the shape and tools boxes. we then drew a long rectangle,we then rotated the rectangle we rotated it to 90 degrees and then copied it so there were 2 rectangles. we then selected both and merged them via pathfinder. |
 |
| we then made a green rectangle with a circle in the middle and used the move to front tool which took the circle out of the rectangle. |
 |
| the red shape was done using the exclude tool. |

if you then drag the shapes into swatches and create a new shape it will create a new pattern.
Wednesday, 21 March 2012
Final Design + Toile
 |
| My final Design - A Volumous cape! |
I have done a paper version since we are only toiling in white so that I can see how the colours will react together and have started to consider ways that I can start to layer them so that they look more interesting, in my book. I have also today done my Toile and have shown Angela who liked it but said that because of the time restraints that I should make the petals more spaced out and bigger so that I will finish by the deadline without stress since everyone will be trying to get on the single spot welder.
 |
| My Lasercut petals, although will be in black and white. |
 |
| My sonic welded ties for my cape. |
Thursday, 15 March 2012
Leather Inductions
Today we had leather inductions on the Walking frog, Disk post, Disk machines, and Twin needle. These were so that we could work with leathers so that we could make our shoes but also in case we wanted to change to accessories and do things like bags etc, or use leather in our collections. The machines which have posts/arms are the ones that are best used when you have a curved surface such as a shoe since it allows you to get into more angles far more easily than the flat machines. The machines are designed for heavy weight materials or leather which would quickly break a normal sewing needle that you use on fabric, as you can see in the bottom pictures once you sew onto leather you can't unpick otherwise you are left with a row of holes where the needle went in (top of the bottom picture).
.jpg) This means that if in future I want to make any garments out of leather I need to become much more efficient at using the machines so that I can sew it right first time,since I can't unpick and leathers are expensive. I can do this by sewing more garments since it will improve my sewing abilities and by practicing on scraps of leather that are laying around so that I can practice simple shapes like circles etc which will help me later with more complicated patterns.
This means that if in future I want to make any garments out of leather I need to become much more efficient at using the machines so that I can sew it right first time,since I can't unpick and leathers are expensive. I can do this by sewing more garments since it will improve my sewing abilities and by practicing on scraps of leather that are laying around so that I can practice simple shapes like circles etc which will help me later with more complicated patterns.
.jpg)
Monday, 12 March 2012
Final Design for Shoes
Today I showed my designs that I had worked over the weekend on to Kieran. She particularly liked my wedge sandals and how colourful they were however I decided not to make any of them since I couldn't make the wedge heel before the project hand in and so thought that it took away from many of the designs. She however liked 2 of my flat sandal designs and said that I should mix the 2 together since I liked the big metal disk from one but liked the overall design of the one below. I therefore have been working to mix the 2 together. I think this has helped me because I have vastly improved in Photoshop which is what I designed most of the shoes in and have found it to be a great help and can see why Photoshop/Illustrator/In-Design have become so popular in the industry since you can easily take bits that you like from other shoes and make an entirely new shoe that is much better than the originals so easily.
For the shoebox section I have been on WGSN and started to look at packaging trends,materials,structure and print patterns. This will help me to create a fashion forward shoe box that is on trend, I have also tried to improve on my presentation with these new pages by laying them neatly out in word and then being just able to print them out which has made the pages look a lot neater since the pictures are all straight etc. and well presented.
For the shoebox section I have been on WGSN and started to look at packaging trends,materials,structure and print patterns. This will help me to create a fashion forward shoe box that is on trend, I have also tried to improve on my presentation with these new pages by laying them neatly out in word and then being just able to print them out which has made the pages look a lot neater since the pictures are all straight etc. and well presented.
Thursday, 8 March 2012
Laser Cutting comments+reflection


Wednesday, 7 March 2012
Richard Sweeney


Tuesday, 6 March 2012
Illustrator 2
Cloning and Aligning
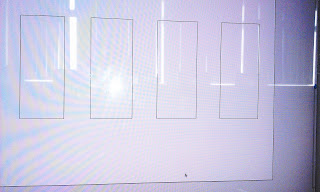 Create an A3 landscape page using the people icon and changing the size. Draw a rectangle with the rectangle tool. Then press the alt and clone them to move them. CMD + A to select them all. then click align centre to make them all align up. Then click the horizontal distribute center to make the spaces between them correct.
Changing Stroke Colour.
 Then create a square and change it so that it has no fill, by clicking the white box with a red line through, change the stroke colour to a different colour and to make bolder increase the pt. then create a second stroke and leave it as black and increase the pt so that you can see it.Then add in another stroke in a different colour.
Distort & Pucker.
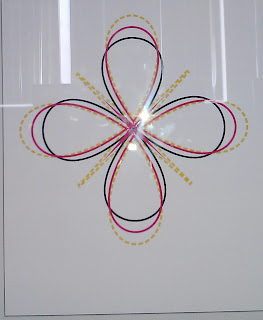 Then click one of the lines and distort and pucker it to create a pattern. then click dash and put in values to create a gap style.
Ungrouping.
 select the whole thing, object then expand appearance and right click and ungroup, then they will move seperately. Then clear the board.
Creating Shapes.

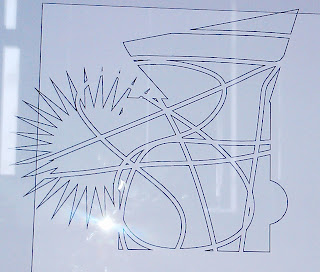
Pattern Tool.
Create a rectangle with a circle as well that overlap. then open pathfinder. then join them by selecting them all and pressing the left hand tool. then use the eraser tool to create a new pattern.
 Create an A3 landscape page using the people icon and changing the size. Draw a rectangle with the rectangle tool. Then press the alt and clone them to move them. CMD + A to select them all. then click align centre to make them all align up. Then click the horizontal distribute center to make the spaces between them correct.
Changing Stroke Colour.

Distort & Pucker.
 Then click one of the lines and distort and pucker it to create a pattern. then click dash and put in values to create a gap style.
Ungrouping.

Creating Shapes.


Then create a rectangle, and a square by double clicking. double click and accept the value for a circle if you want it to be circular. Click the polygon tool and create 3 sides for a triangle. click the star value and then you can change how many you have.
Pattern Tool.
Create a rectangle with a circle as well that overlap. then open pathfinder. then join them by selecting them all and pressing the left hand tool. then use the eraser tool to create a new pattern.
Monday, 5 March 2012
Shoe Project Comments + Reflection
Kieran today looked at our books and I was told that my research and idea's were good but to start to design my shoes and to look at ways of embellishing the leather if I so wanted to and to create my patterns since I am looking into the idea of printing or laser cutting the leather from a pattern that I have made using ancient Greek symbols etc.
Therefore I will start to laser cut some patterns out on paper and will also start printing some patterns onto fabric that I design and will then try to do the same onto white matte leather if I have the time to.
I have also started my marketing research for the shoebox section of this project and have started to look at conceptual packaging, and have completed my S.W.O.T & pen profile for my research. This will help me to identify the packaging that I will use based on my research into my clients and the need of my shoe.
 |
| A design created using Image Maker on Calico. |
Therefore I will start to laser cut some patterns out on paper and will also start printing some patterns onto fabric that I design and will then try to do the same onto white matte leather if I have the time to.
I have also started my marketing research for the shoebox section of this project and have started to look at conceptual packaging, and have completed my S.W.O.T & pen profile for my research. This will help me to identify the packaging that I will use based on my research into my clients and the need of my shoe.
Thursday, 1 March 2012
Lasecut Project Reflection + Comments
Today I was told to work more on the mannequin and to make the pieces we're making more couture, I have therefore decided to find some origami 3D shapes to make and put onto the jacket that I will be making, and we need to also make the outfit less fitted so I am focusing on the 3D shapes rather than the fit of the jacket.
 Some inspiring pictures I intend to work from:


Subscribe to:
Posts (Atom)